Adding or Editing accounting vouchers
To learn more about this app's basic functions when editing data, please click here ...
NXAccounts has been built to enable users to register accounting vouchers quickly, efficiently and with as few keystrokes as possible. In this process you will save a lot of time by focusing on the keyboard only - and not spending time on moving your hand between the keyboard and the mouse in this process. To achieve this, we use the <TAB> (tabulator) key to jump from one control to the next one. To jump backwards to the previous control you hold the <SHIFT> key while hitting <TAB>
 You will normally find your <TAB> key just above the <CAPS LOCK> key at the left hand side of your keyboard.
Please click the MainForm's 'Tables' button and make sure the 'Transactions' tab is open. Here you see the list of all saved transactions, grouped as vouchers, for the current year.
After having clicked Add (voucher) and the voucher edit form has popped up, make sure you have selected the correct Period / Month in the upper left corner of the form:
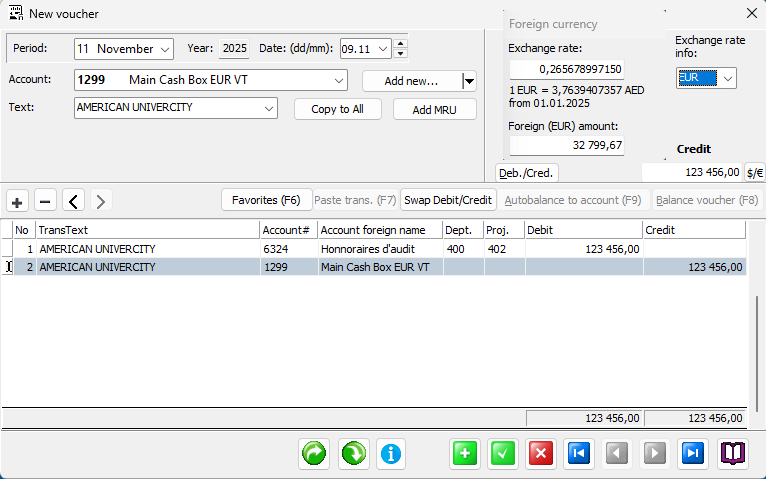
Voucher period and date:
![]()
The app always remembers your last used period. The period defines the financial month of the income / expense. This is necessary in order to compare the accounting against cash counting for a month or auditing your bank statements against the app's statements for corresponding bank accounts.
Remember to check the current period each time you start a new session registering vouchers. For every new voucher the cursor is always placed at the day number in the date control. NOTE: You only need to enter the day number here (one or two digits, as the month number is automatically copied from the period) and then press the <TAB> key to jump to the account number control. However if your physical voucher is from another month you may of course add the month number too, just make sure you separate them with your Windows' date separator.
Transaction's account:
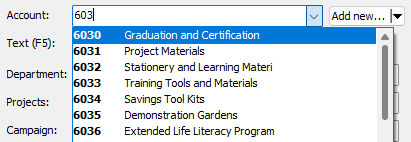
As you start typing some digits or some text in this dropdown control, the app will lookup any matching accountnames and you may use the arrow keys or mouse to select the desired account. Proceed by pressing the <TAB> key to continue. For payables / receivables account types always remember to prefix their account number with an asterisk (like this: *1212)
NOTE: When registering vouchers, always enter the (or all) result type account transaction(s) first and finally balance the voucher against an appropriate balance account (usually cash or bank) as the voucher's last transaction.
Transaction text:
Try to describe the vouchers nature with as few words as possible:
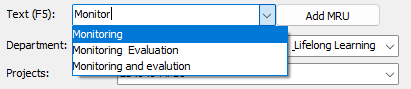
The same lookup feature is available here too. Select an existing text, modify it or type a new text as needed. Continue to next control by pressing the <TAB> key.
Dimension code or number: Enter each dimension's number or code just as you did for the account. Their name will appear in the list so you know what you have chosen. Jump to the next control by pressing the <TAB> key.
More IMPORTANT info here on Default or Mandatory Dimensions
If you have no extra dimensions in your license, please jump directly to the Transaction amount paragraph below by pressing <TAB> until you arrive.
Transaction amount:
![]()
If you usually register expenses, then the initial position of the amount control would be debit (left position). You may quickly move to credit or back to debit by pressing the 'C' or the 'D' key. Pressing the function key F3 will swap Debit and Credit. Enter the desired amount using your Windows' default locale decimal sign (if applicable).
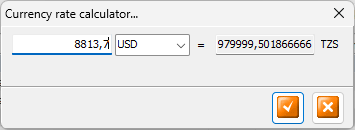
If your voucher is issued using a foreign currency amount, you have to convert that to the transaction currency. In this situation you may click the $/€ button (right hand side of amount control), see above.
The currency rate calculator dialog below will now appear. Make sure you have entered relevant foreign currency exchange rate values for the selected currency before using this feature.
The voucher's first transaction is now completed:
Most vouchers only have two transactions. If this is the case now, please jump to the Balancing Voucher paragraph.
If you need adding more transactions before completing or balancing the voucher, press function key F4 and continue from 'Transaction account' above.
Balancing the voucher: When all the incomes or expenses transactions are entered it is time to balance your voucher (normally against a cash or bank account). So please press function key F9 to pop up the AutoBalance list of most used balancing accounts. If you haven't done this before, please select the account you use most (your Main Cash or Main Bank?) on its line #1 and add other accounts (cash or bank) further down the list. This list will be preserved until you modify it in the future. By pressing the numeric key for the digit to the left of the desired account (or clicking its button) the balancing transaction against the selected account will be automatically be added!
For vouchers to be balanced against to your FIRST account on your AutoBalance list, you may just press directly F2 after having filled in the amount. Many keystrokes saved!
If you need to balance your voucher against a non-common account you just select the desired account, copy or enter the desired text and then press function key F8 to auto-balance your voucher against your selected transaction in the grid..
If you discover any errors in any transaction data you may click the desired transaction row and edit its data in the controls where you entered the data. If you need to re-balance the voucher then click to select the desired balancing (lower?) transaction and press function key F8 to update the balance amount.
If you want to change ALL transaction texts on a voucher, you may click the Copy To All button and the selected transaction's current text will be copied to all the other transactions!
Now the voucher is balanced and ready to be saved. If you want to continue registering another voucher, press function key F2 (Save + Add new). If you want to quit and close the form then just press the <ENTER> key (Save + Close window).
NOTE: Exporting and use of voucher TEMPLATES (buttons below)
Exports
We have now added the possibility of save (Export) voucher templates (with two or more transactions) which you frequently need to re-use. This WILL save you a LOT of time when you get acquainted to use this feature.
Export such voucher's transactions and give a descriptive name to the template file for later re-import.
NOTE if you get in trouble: If you by some reason are unable to save a big voucher, you may click the same right green Export button (bended down arrow) to save all completed transactions to a template file which later can be retrieved.
After having clcked the Export button, this window appears:
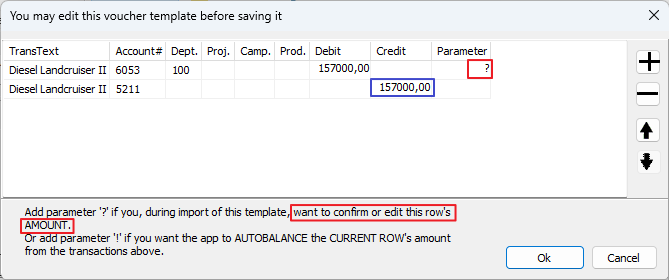
Note the text in the red frames above! If the row's amount field needs to be modified during the import, you may enter a question mark as parameter (useful if the amount is not fixed every time you re-use it). This enables you to edit the suggested amount by just start typing the correct amount(s) during the import! Also note that by putting a '!' (exclamation mark) as parameter a new line will be inserted with the accumulated amount of the row's account (blue frame). Normally you just erase the last row's amount as this will be automatic recalculated by the import process.
Importing saved vouchers
When you want to import a voucher template file, you click the left green Import button (bended right arrow), select the file you want to import. Immediately all transactions you previously saved are loaded into the voucher form. Any rows with the '?' (question mark) parameter will put the process on hold until you have confirmed (by the <TAB> key) or modified its amount (by entering digit keys).
NOTE: The importing process will be aborted if you use the mouse or any other keys than digit keys or <TAB> key!
Please play with this feature until you understand feature actually work. We are sure you will find that using it will save you a lot of time!